Checkout the new ability to merge and rebrand submittal packages.
Walkthrough Video
Webinar
Create a New Submittal
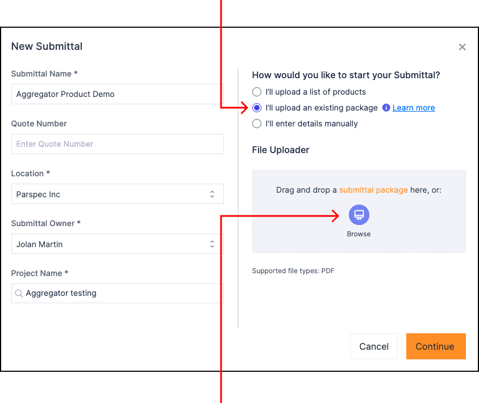
- Click 'Create Submittal' & select 'I’ll upload an existing submittal package'.

- Upload the first submittal package you'd like to aggregate or rebrand and hit 'Continue'. Don't worry, you'll be able to import more packages later on. Refer to Upload Additional Products & Submittals to learn how to do so.
Start with the submittal for which you'd like to see the products at the top of your final package to minimize product reordering in later steps.
Select Products
In this step you will first need to identify the list of products this submittal contains.- Scroll down to the Table of Contents and click 'Select Products'.
-png.png?width=607&height=388&name=Select%20TOC%20(2)-png.png)
- Click and drag to draw a selection around the Table of Contents. Be generous with your selection as shown above. If the Table of Contents spans multiple pages, draw one selection on each page.
- Once all your selections are drawn, click 'Confirm Selection(s) ->'. A popup showing the extracted product information will appear.
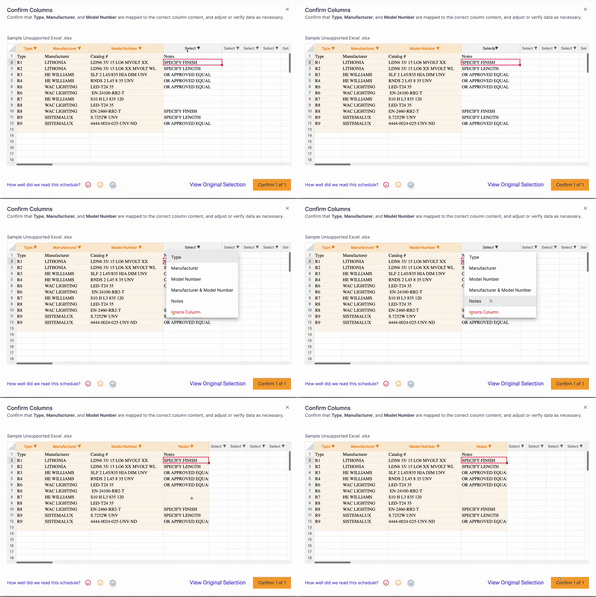
- Ensure that columns are labeled properly. If they are not, or if the table of contents includes additional columns (ex: notes), click on a column header to indicate its contents. Orange highlighted columns are imported. White columns are discarded.
If necessary, double click into any cell to edit the information.
- Click 'Confirm', and repeat these two steps for every selection you made.
Select Submittal Content to Extract
In this step, remove pages you don't want to keep and optionally remove headers and footers of the existing submittal if you want to rebrand your package.
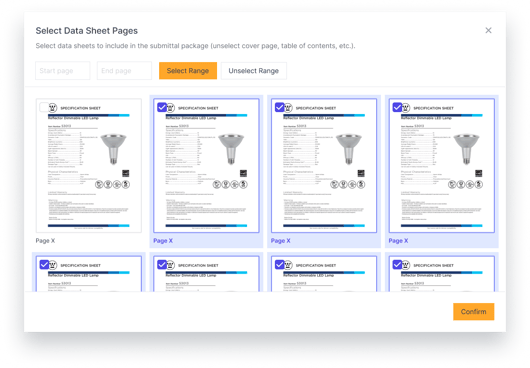
- In the 'Select Data Sheet Pages' popup, unselect pages to remove from the package. Unselect any page that isn't tied to a product (Cover pages, Table of Contents, Page Breaks, etc.). Once the selection only contains pages to extract and match to a product identified in the Table of Contents, click 'Confirm'.

- In this step, every page is covered by an orange selection which represents the content to keep. Areas not covered by the orange selection will be discarded. If you want to rebrand your package for example, click on any of these orange selections and drag its borders such that it excludes the header and footer.
-png.png?width=463&height=257&name=Select%20TOC%20(3)-png.png)
- Select any orange region you adjusted, and click 'Apply to All' or 'Apply to Range' to copy it to other pages that share a similar format. You can also adjust these selections independently for any page that varies in header or footer height.
- After you have adjusted cropping regions for the package, or if you want to keep existing branding, click 'Confirm & Continue'.
Confirm Products and Next Steps
- Import more products by uploading other submittals, or simple product lists. Refer to Upload Additional Products & Submittals to learn how to do so.
- When your list of products is finalized, click 'Confirm Products ->'. Products extracted from a submittal have the datasheet marked as confirmed and annotated.
- Adjust the pages associated to a product by navigating to the Annotate Step for the desired product, and clicking 'Adjust Page Selection'. Unselected pages will be hidden from the package.
- When formatting your submittal, Disable the Headers & Footers if you want to leave existent branding.
These submittals behave like any regular submittals. Add, edit, hide, or delete products, select or change datasheets, annotate, customize your package, and compile, as you would normally.
Upload Additional Products and Submittals
- Navigate back to Step 1 - Select Products. Quick tip: Use the stepper to navigate there the quickest!

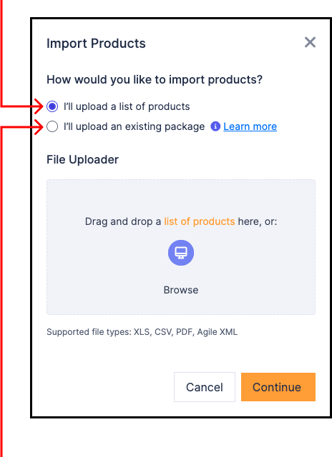
- From there, click 'Import More Products', and choose whether you want to upload a list of products or an existing submittal package.
- Import a list of products without datasheets. (Quote, schedule, TOC, etc.)...

- ...Or select 'I’ll upload an existing submittal package', to go through the steps described above with another submittal.
- Import a list of products without datasheets. (Quote, schedule, TOC, etc.)...
